Sail Handling - Light Weight Lazy Jack Kit Fitting Instructions
FITTING INSTRUCTIONS FOR LIGHTWEIGHT LAZY JACK KITS
For yachts up to 9m (30ft)
Part No. 41 140
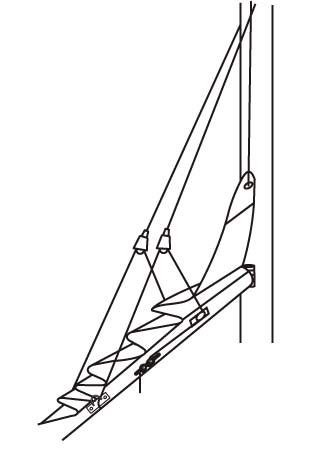
The lightweight Lazy Jack System allows the mainsail to be easily reefed or stowed in all weather conditions.
This ‘all-rope’ kit features our unique block covers and is intended for lightweight use. This Kit is not designed to take the full weight of the boom and we therefore recommend that the topping lift be used.
The Barton Single Line Reefing Kit in conjunction with the Lazy Jack Kit makes Reefing safe and simple as this can all be carried out from the safety of the cockpit. For further information please visit our website www.bartonmarine.com or contact your Barton stockist.
| 1. | Contents of your Lazy Jack Kit: | |
|---|---|---|
2 x block assemblies (including block covers, line and eye for attaching to mast). (No 1) |
||
| 2. | Tools Required for fitting | Tools Drill Bits & Taps |
Pencil |
5 mm Dril 3.3mm Drill (To use in Hammer conjunction with the 4mm Electric Drill tap) 4 mm Tap |
|
Note: |
||
| 3. | Locating the eye position | |
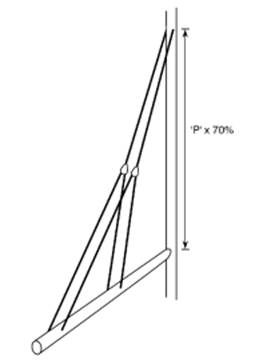
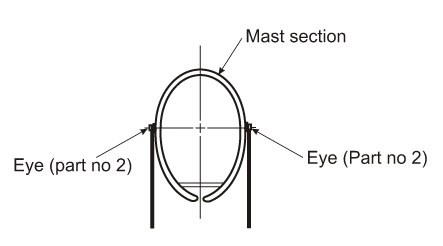
An eye needs to be fitted to the centreline of each side of the mast to support the Jack lines. These tangs are already fitted to the system (No 2) and only need pop riveting to the mast side wall. They can either be fitted with the mast in position (by using a Bosun’s chair with assistance) or with the mast lowered. To find the position of the eye, identify the sail luff length (P measurement on your sail plan). The eye should be positioned approximately 70% of this measurement. With the boom in its normal sailing position, measure up from the tack and mark on each side of the mast. |
||
| Diagram A - Showing measurement from the Gooseneck | ||
 |
||
| Diagram B - Showing position on sidewall. | ||
 |
||
| 4. | Installing Eye (No 2) | |
An eye needs to be fitted to the centreline of each side of the mast to support the Jack lines (see diagram B). These tangs are already fitted to the system and need pop riveting to the mast sidewall. They can either be fitted with the mast in position (by using a Bosun’s chair with assistance) or with the mast lowered. Using the eyes as a template, centre punch the holes, then drill 5 mm dia. holes into the mast. Rivet each tang to the mast using a heavy-duty rivet gun for popping stainless steel rivets. Safety: Make sure you are tied off securely before working aloft. Always check that there is no one below when working with tools above |
||
| 5. | Fitting the control lines and boom fittings | |
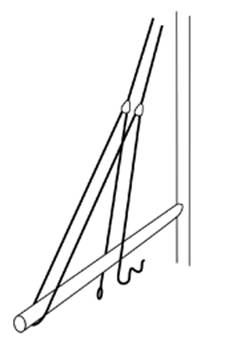
Select which side of the boom you want the adjustment (No 5)cleat and then reeve the control line as per diagram C. It may be helpful to temporarily position the line using tape. It is now necessary to mark the position of two eye straps (No4) which secure the aft boom position of the control line. |
||
| Diagram C - Reeving the Lazy Jack around the boom. | ||
 |
||
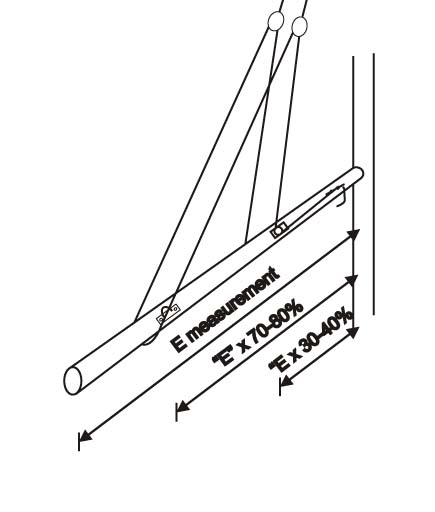
It is now necessary to mark the position of two eye straps (No4), which secure the aft boom position of the control line. To find the boom positions, first identify your boom length (E measurement on your sail plan). |
||
| Diagram D - Positioning the fittings on the boom. | ||
 |
||
| The two aft eyes (No 2) should be positioned between 70% and 80% of this measurement. The forward eye and cheek block (No 3) should be positioned between 30% and 40% of the boom length. These dimensions can be adjusted as necessary to better suit a high aspect, low aspect or fully battened sail. When all these positions are marked then use the fittings as a guide and centre punch the holes. Selecting the appropriate drill bit, drill and secure with stainless pop rivets. Before securing the cheek block (No 2), decide whether you wish to position the cleat (No 5) forward or aft of the block as this affects the rope lead and the cheek block may have to be turned around. Using the block as a template, centre punch the holes, drill and then rivet it to the side of the boom. | ||
 |
||
When riveting the cheek block there is a limited space for the rivet gun so use the brass spacer between the rivet gun nozzle and the cheek block to ensure the rivet is correctly aligned. |
||
| 6. | Mounting the adjuster cleat (No 5) | |
Select a mounting position that is clear of other equipment. Swing the boom to ensure that it cannot snag either the shroud or the side of the mast. Again, use the cleat as a template, centrepunch and drill the holes with the 3.3 mm drill bit to accept the machine screws supplied. Tap the holes using the 4 mm tap and assemble. After securing, the screws can be removed and the surplus length inside the boom cut off. This will reduce the possibility of snagging internal control lines on the sharp end of the screws. All the installation work is now complete. |
||
| 7. | Adjusting the system | |
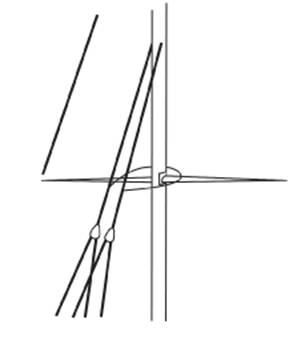
Whilst still at the dockside set the Lazy Jack line by raising the mainsail and tightening the mainsheet down to get the boom as low as possible. Tighten the Jack Line, leaving about 2” – 3” of slack. This position should ensure that the Lazy Jack does not interfere with the sail setting when sailing, but collects the sail when the halyard is released. Further adjustment may be necessary and it is useful to mark the final position with a felt pen on the line to coincide with the cleat position. Swing the boom out and check that the fully adjusted Lazy Jack Lines do not snag the spreader ends. Lift the end of the boom and swing it about to see if there is the possibility of snagging. If they do catch, then fit a thin length of shock cord (not supplied) to one Jack Line, lead it around the mast, but above the spreader bracket and connect it to the other Jack Line – see Diagram E. The shock cord length needs to be adjusted so that there is enough tension to stop the Jack Lines from swinging around the end of the leeward spreader. If the shock cord does not resolve the problem, then it may be necessary to reposition the tangs on the mast. |
||
| Diagram E - Fitting Shock cord to clear the spread ends. | ||
 |
||
| Saftey: Never set a sail whilst the craft is out of the water. When at dockside only raise the mainsail when the conditions allow, ensuring that the craft is securely tied and there is not the possibility of a gybe. | ||
| 8. | Sail trials and checks | |
When you first raise the sail on trials, check that the headboard and batten pockets clear the Lazy Jack Lines. It is always better to raise the sail when the craft is head to wind. When sailing downwind, let the boom out to its maximum position and again check that the lines do not foul the spreader ends. If they do then take steps detailed in paragraph 7. |
||
| 9. | Lowering the mainsail | |
Turn into the wind and simply let go the halyard. The sail should flake neatly between the Jack Lines. If the sail is stiff in the track then it may require pulling down, but the Lazy Jack will do the collecting. Remember this kit is not designed to take the full weight of the boom when lowering the mainsail, so the topping lift will need to be tightened before commencing. You can now either set a reef in the sail or stow the sail. |
||
| 10. | Sail cover alterations | |
Your sail cover may have to be adjusted to accommodate the Lazy Jack lines. When the installation is complete and tested, offer up your sail cover and mark the position of the lines on both sides. Your local sailmaker will be able to add a slit opening, secured by Velcro or similar, at a nominal charge. Alternatively, you may be able to leave enough spare rope to allow the Jack Lines to stow along the boom under the existing sail cover. |
||
| 11. | Maintenance | |
The Lazy Jack system only requires occasional checking for chafe. We recommend that the blocks are washed with a hose occasionally to remove salt deposits. Our system includes unique block covers, which will reduce the possibility of chafe on the mainsail. |
||
Lazy Jack is yet another great product from Barton. A large range of marine hardware for yachts up to 50ft is detailed in our catalogue, available on request. |
||

