

DO 550 Clutch Fitting Instructions
| The Barton D0550 clutch is designed for both cruising and racing yachts up to 11 metres. It is manufactured from modern, lightweight materials to withstand the harsh marine environment. Moulded parts are from high-grade plastics, which are strong, light and impact-resistant. Cams and bases are from marine grade aluminium, ‘Spectro’ anodised for high wear resistance and long life. The true clutch mechanism allows the line to be adjusted through the unit in the closed, locked position with minimal slippage. Release under load is positive and requires little effort. The mechanism’s opening and closing action is precise and easy to operate, even with cold, wet hands. A positive handle lock in the closed position is also featured. A unique feature of this design is the removable insert on the top face of the handle. Pop this out and you can easily replace it with printed coloured inserts to denote at a glance the function of the unit. The removable inserts are available in 2 different packs: “Cruiser pack” part number 81540 which includes 7 coloured inserts; “Main”(L/blue), “Genoa 1” (Green), “Spin Halyard 1” (Red), “Topping Lift” (Yellow), “Spin pole up” (Green), “Spin pole down” (Red) and a blank (Grey) “Racer pack” part number 81541 which includes 12 coloured inserts; “Reef 1” (Orange), “Cunningham” (Yellow), “ Reef 2” (D/blue), “Kicker” (Yellow), “Mainsheet” (Red), “Genoa Furling” (Orange), “Genoa 2” (L/blue), “Spin Halyard 2” (Yellow), “Backstay” (Yellow), “Outhaul” (L/blue), “Downhaul” (Green) and a blank (Grey). For more information please contact your local Barton stockist or visit our website www.bartonmarine.com The clutch’s cam and base, manufactured from high grade extruded aluminium, features a specially tempered tooth design. This allows for maximum grip with minimal slippage, whilst being kind to your lines. Stainless steel rope fairleads are fitted to both line entry and exit points, this feature prevents wear to both clutch and lines. The D0550 clutch features the advantage of a bolt-together construction, which allows for ease of servicing and replacement of parts. (A full range of parts and inserts are sold separately). The DO 550 is designed for use on 8 to 12mm lines for a maximum holding force of 550kgs. The larger the line the higher the holding force. The clutch can be used for smaller rope sizes than advertised, this reduces the holding force but can be useful for a lighter application where the loads are smaller for example Furler lines, Bowsprit tack lines etc. The DO550 is designed to use braided line. Please contact your retailer for further information on line etc (The DO550 is not designed for use on non braided lines or wire). |
| Fitting Instructions and Maintenance manual |
| Clutch alignment (Horizontal) The clutch is designed to fit between the winch and the deck organiser. Keep the rope deflection angle as small as possible. When installing multiple clutches try to ensure the clutches with the higher loads has the least deflection angle. |
 |
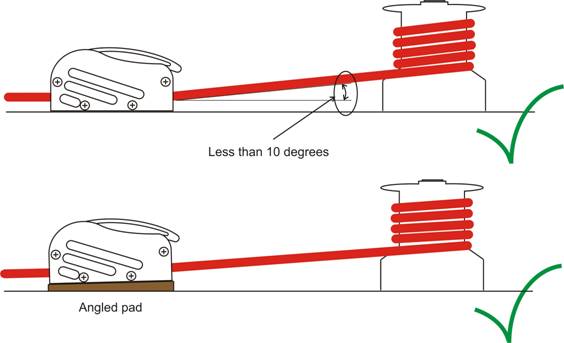
| Clutch alignment (vertical) The vertical angle of the line from the clutch to the winch should not exceed 10 degrees. To reduce the angle either increase the distance between the clutch and the winch or raise and angle the clutch using a pad made from teak or nylon. |
 |
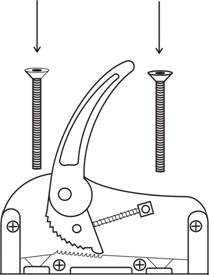
| Fitting Instructions For single clutches use-drilling template on packaging Tools required:
6mm Counter sunk machine screws, 6mm nylock nuts, 6mm penny washers, backing pad. |
 |
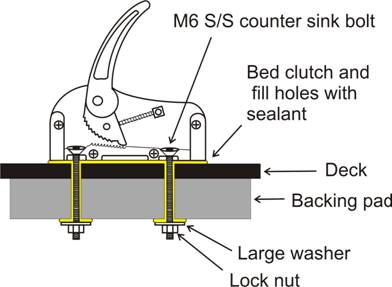
| Use 6mm (1/4”) Counter sunk stainless steel fastening, full nuts and penny washers to secure An Anti corrosive jointing compound is required between the counter sunk screws and the aluminium base of the clutch Apply silicon sealant to the holes, the base of the clutch and between the deck and the base to ensure a watertight seal etc. |
 |
| To ensure the best watertight seal is achieved, we would recommend slightly tightening the bolts, allow the sealant to cure for 24 hours and then tighten the bolts fully. This will allow the sealant to form a watertight gasket. If you require any more information, or you are unsure about any aspect about installation please contact your local boatyard for more advice. |
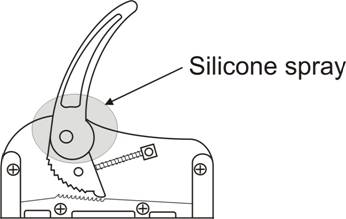
| Assembling line into clutch Ensure handle is open and pushed fully forward. The front of the clutch should be facing the mast; this is the end the handle pivots on. Thread the line through the front bullseye, through the mechanism and out through the aft bullseye. When operating the clutch For greater performance and rope grip raise the handle to the vertical and then push the handle back down into the locked position before easing the load from the winch, this will minimizes the amount of travel the cam needs to make before the cam is fully engaided. Maintenance |
 |
|
| SHOULD YOU HAVE ANY QUESTIONS WITH REGARD TO INSTALLATION OF YOUR CLUTCH PLEASE CONTACT YOUR CHANDLER IN THE FIRST INSTANCE. |